Dockerizing Your Python Applications: How To
Dockerizing your Python applications is an easy way to ensure your Python workloads run reliably. But is Dockerizing all you need to scale your workflows? Building your Python applications into a Docker container gives you several benefits off the bat:
- Packages your scripts with all the dependencies they need to run
- Fully isolates this workload from other workloads running on the same compute infrastructure
- Creates a portable runtime container that you can run on any Docker-compatible cloud platform or container hosting service
However, simple containerization deployments lack a few critical capabilities that enable them to be resilient and scalable. Particularly, they lack a consistent approach to observability - the ability to view, diagnose, and resolve potential issues in your workloads.
In this article, I’ll walk through the basic steps of Dockerizing a Python application. Then, I’ll show how to make your Dockerized workflows even more robust with workflow traceability, observability, logging, & robust error handling.
How to Dockerize your Python applications: Walkthrough
In this walkthrough, I’ll show the following:
- How to Dockerize a Python application that downloads a JSON file from Amazon S3 in AWS, transforms it, and stores it in a database such as PostgreSQL
- How to convert this application into a workflow that can run anywhere and scale, no matter the size of the workflow
- How to run this Docker container as a workflow in any environment that supports container runtimes.
To do this walkthrough, you’ll need the following installed locally:
- Python 3.12 or greater
- Docker (or Docker Desktop for Windows)
This walkthrough assumes a vague knowledge of Docker and the concept of Dockerization. If you need more background, read the full overview on the Docker Web site.
Step 1: Create your Python application
Assume you want to fetch a JSON file in an Amazon S3 folder in the following format (sample data borrowed and modified from JSON Editor Online):
[
    { "name": "Chris", "age": 23, "city": "New York" },
    { "name": "Emily", "age": 19, "city": "Atlanta" },
    { "name": "Joe", "age": 32, "city": "New York" },
    { "name": "Kevin", "age": 19, "city": "Atlanta" },
    { "name": "Michelle", "age": 27, "city": "Los Angeles" },
    { "name": "Robert", "age": 45, "city": "Manhattan" },
    { "name": "Sarah", "age": 31, "city": "New York" }
  ]
Assume you don’t care about the individual people - what you want is a rollup that counts the number of people in each city. You also want to normalize this data - e.g., you know that “Manhattan” is a borough of New York, and you want to count it as “New York” instead. In other words, you want something like:
[
	{ “city”: “New York”, “people_count”: 4 },
	{ “city”: “Atlanta”, “people_count”: 2 },
	{ “city”: “Los Angeles”, “people_count”: 1 },
]
You can pull this off with a simple Python script:
# Based on sample JSON file from https://jsoneditoronline.org/indepth/datasets/json-file-example/

import boto3, json

city_normalizations = {
    'manhattan': 'New York'
}

# Reads the JSON file from an S3 account.
# NOTE: Assumes the S3 object is public.
def get_json_file():
    client = boto3.client('s3')
    response = client.get_object(
        Bucket='jaypublic',
        Key='data.json',
    )

    return json.loads(response['Body'].read())

# Transforms a list of people who lives in cities into a count of people per city.
def transform_json_file(json_obj):
    dict = {}

    for obj in json_obj:
        key = obj['city']
        if key.lower() in city_normalizations:
            key = city_normalizations[key.lower()]
        if key in dict:
            dict[key] = int(dict[key]) + 1
        else:
            dict[key] = 1

    return dict

def save_transformed_data(save_dict):
    for key in save_dict:
        print("{}:{}".format(key, save_dict[key]))
        # Save to DB - step omitted for ease of tutorial

#    return

if __name__ == '__main__':
    json_ret = get_json_file()
    new_dict = transform_json_file(json_ret)
    save_transformed_data(new_dict)
I’ve divided this up into three method calls, as each represents a distinct part of the workflow:
get_json_file()obtains the public JSON file from S3transform_json_file()performs the data transformations to put the data into the format I needsave_transformed_data()saves the data to a datastore. Note that I’ve edited this part to keep the sample simple (I’ll leave standing up a PostgreSQL instance as an exercise to the reader).
To make this work, you’ll need a way to load your dependencies - in this case, the AWS Boto3 library.
To test this, run the following commands to establish a virtual environment for the script to run it like an application:
python -m venv pythonapp
source env/bin/activate # On Windows, use: pythonapp/Scripts/Activate.ps1
pip install -r requirements.txt
python s3.py
This will yield the following output:

Step 2: Dockerize your Python application
That’s the hard part done. Now, time to wrap this up in a Docker container.
To create a Docker container, you create and then build a Dockerfile. A Dockerfile builds off of a base image, which is usually a lightweight version of a Unix or Windows operating system. It then builds on this base image with a set of commands, each creating a new layer in the Dockerfile.
Layers are a time-saving feature in Docker. If you modify a Dockerfile, Docker doesn’t have to rebuild the entire container; it only has to rebuild from the last layer you modified. SimilarlySImilarly, a container runtime doesn’t have to re-download the entire container - only the layers you changed. This makes shipping changes to a Docker container fast and lightweight.
The following Dockerfile will build a Docker container that runs your Python application above:
FROM python:3.12

RUN mkdir /usr/src/app

COPY s3.py /usr/src/app

COPY requirements.txt /usr/src/app

WORKDIR /usr/src/app

RUN pip install -r requirements.txt

CMD ["python", "./s3.py"]
Here’s what each line of this Dockerfile is doing:
- FROM: Defines the base image your container will use - in this case, the standard Python 3.12 image from the Docker Hub repository, which runs on a stripped-down verison of Linux that contains both Python and pip.
- RUN: Runs a command in the target operating system. In this case, it creates the directory
/user/src/app, where we’ll stage our code. - COPY: Copies both your Python application and requirements.txt file to the application folder in the container image.
- WORKDIR: Switches the current working directory to our app folder.
- RUN: Here, the RUN command uses
pipto install all the Python libraries your app will need. - CMD: Specifies the command that your container will run on startup. In other words, when your container starts running, it’ll run your Python application to perform your data transformation workload.
You can build your Dockerfile with the following command:
docker build -t python-app .
To run this container, you’ll need to specify AWS access key credentials for boto3. Ideally, you’d store these in a secrets manager of some sort, or use an IAM Role if you’re running your container in AWS. For this example, you can supply them at runtime. Use the docker run command to run your container as follows, adding your own AWS access key and secret key:
docker run -it -e AWS_ACCESS_KEY_ID=<access-key> -e
AWS_SECRET_ACCESS_KEY=<secret-key> python-app
Here, the -e arguments define environment variables for the running container. The -it argument redirects the output of the container to the console so you can see that it ran successfully.
Step 3: Turning our Python script into a workflow
This works! However, you’re still missing a lot in terms of truly operationalizing this workflow. This approach has:
- No consistent approach to logging
- If something fails, no clear way to tell at which point it failed or why
- No way to see logs and metrics from a single dashboard for all of your containerized workflows
- No visibility into where this or other containerized code is running in your infrastructure
- And no ability to recover from failure
This is where Prefect comes in. Prefect is a workflow orchestration platform that enables monitoring background jobs across your infrastructure. With Prefect, you can encode your workflows as flows divided into tasks. The best part is that you can do this by making only minimal modifications to your Python application.
I’ll break the next part up into two steps. First, I’ll demonstrate how to convert the Python application above into a Prefect workflow and run it locally. Next, I’ll show how to ship this and run it on Prefect within a Docker container.
First, copy your Python application to a new file (e.g., s3-flow.py) and make the following changes highlighted below:
# Based on sample JSON file from https://jsoneditoronline.org/indepth/datasets/json-file-example/

import boto3, json
from prefect import task, Flow

city_normalizations = {
    'manhattan': 'New York'
}

# Reads the JSON file from an S3 account.
# NOTE: Assumes the S3 object is public.

@task
def get_json_file():
    client = boto3.client('s3')
    response = client.get_object(
        Bucket='jaypublic',
        Key='data.json',
    )

    return json.loads(response['Body'].read())

# Transforms a list of people who lives in cities into a count of people per city.
@task
def transform_json_file(json_obj):
    dict = {}

    for obj in json_obj:
        key = obj['city']
        if key.lower() in city_normalizations:
            key = city_normalizations[key.lower()]
        if key in dict:
            dict[key] = int(dict[key]) + 1
        else:
            dict[key] = 1

    return dict

@task
def save_transformed_data(save_dict):
    for key in save_dict:
        print("{}:{}".format(key, save_dict[key]))
        # Save to DB - step omitted for ease of tutorial

@Flow
def process_cities_data():
    json_ret = get_json_file()
    new_dict = transform_json_file(json_ret)
    save_transformed_data(new_dict)

if __name__ == '__main__':
    process_cities_data()
What did I change here and why? Going step by step:
- At the top of the file, I’ve imported the Prefect library for Python. You’ll need to add this to your requirements.txt file, which I’ll do below.
- I’ve moved calling the three functions into their own method and marked it as a flow in Prefect. This will surface our flow in the Prefect dashboard, where we can see when and how it ran, see the duration of the flow, and examine logs.
- I’ve marked each of the elements of the flow as a task. That will split the flow up in the Prefect dashboard, enabling you to see how each task performed and if any of the tasks failed. It’ll also make it easy to retry failed tasks, which I’ll discuss more below.
To run this from the command line, first make sure you have Prefect set up:
- Create a Prefect account (if you don’t have one).
- Then, install Prefect and its associated command-line tools locally using pip: pip install -U prefect
- Login to Prefect with the following command:
prefect cloud login
Finally, run your Python application locally:
python s3-flow.py
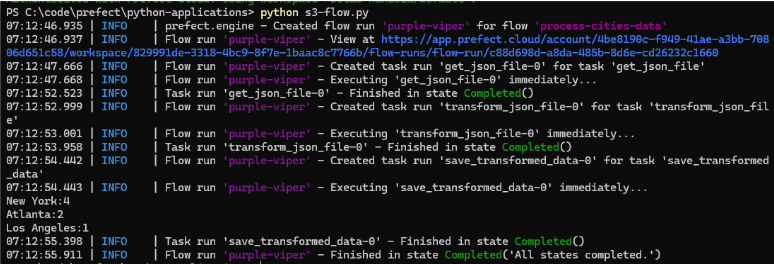
On the command line, you can see Prefect run your flow along with each task that comprises that flow. It gives a unique name and UUID for the run so that you can trace it easily.

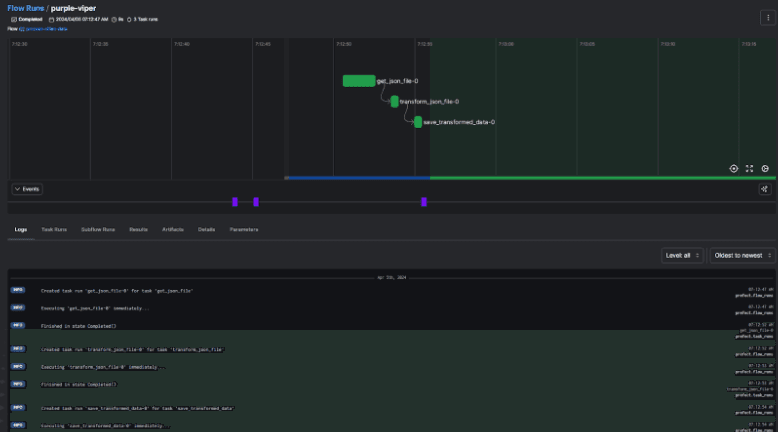
You can dive into the flow and its tasks more easily on the Prefect dashboard. Navigate to https://app.prefect.cloud, select Flow Runs, and then select your flow from the list of recently completed flows.

By selecting this, you can see more details on the flow run, including a visualization of each of the tasks of the flow, how they relate to one another, and how long each task in the flow took to complete. (Not surprisingly, the task containing the remote fetch operation took the longest time.)

Dockerize your Prefect workflow
Now it’s time to bring it all together. You can package this flow as a Docker container and run it on any container-compatible environment.
To package your script as a flow, make the following changes to the Dockerfile:
FROM prefecthq/prefect:2-python3.12-conda

RUN mkdir /usr/src/app

COPY s3-flow.py /usr/src/app

COPY requirements.txt /usr/src/app

WORKDIR /usr/src/app

RUN pip install -r requirements.txt

CMD ["python", "./s3-flow.py"]
Again, this code requires minimal changes to be Prefect-ified. Instead of inheriting from the base Python image, I use the Prefect Docker image, which contains both Python 3.12 as well as Prefect pre-installed. I then changed the name of my Python application file to use the Prefect-enabled version.
After making these changes, compile your Docker container images you normally would:
docker build -t python-app-prefect .
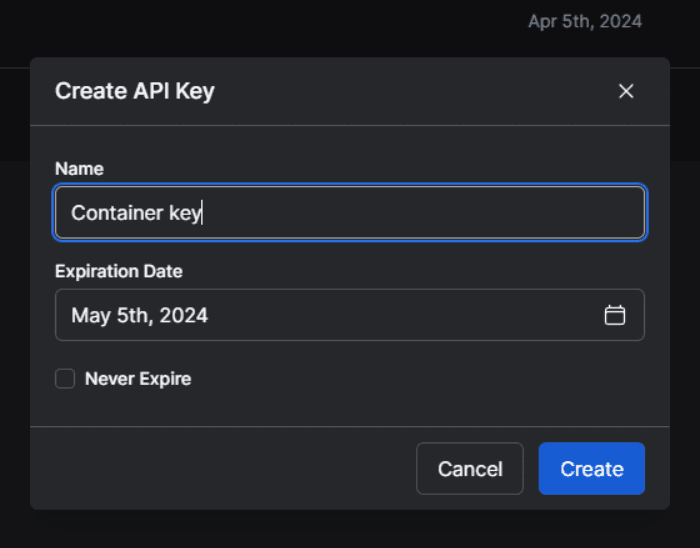
Since this workload will run in a container, you’ll need to supply it credentials so that it can run on Prefect. You can do this by generating a Prefect API key. From your Prefect dashboard, select your account icon (lower left corner) and then select API Keys. Then, select the + button to generate a new key.

Give your key a name, select Create, and copy the key value somewhere safe.
Next, you’ll need the Prefect API URL. You can obtain this for your account by using the command prefect config view.
Finally, run your container locally using the following command, replacing the stub values with your own secret values:
docker run -e PREFECT_API_URL=YOUR_PREFECT_API_URL -e
PREFECT_API_KEY=YOUR_API_KEY -e AWS_ACCESS_KEY_ID=YOUR_AWS_ACCESS_KEY
-e AWS_SECRET_ACCESS_KEY=YOUR_AWS_SECRET_KEY python-app-prefect
That’s it! You’ve successfully Dockerized a Python application, adding additional observability to your workloads with just a few additional lines of code. You can now run this Docker container anywhere you’d run a containerized workload. For more details, check out the Docker page in our documentation.
Next steps
Now that your Python application has been Dockerized with Prefect, you can add additional logging and reliability features to the code with minimal work.
For example, what do you do if the attempt to fetch the JSON file from S3 fails? Currently, there’s no logic in the code to handle this common occurrence. Using Prefect, you can add retry semantics using a simple Python attribute:
@task(retries=2, retry_delay_seconds=5)
def get_json_file():
    client = boto3.client('s3')
    response = client.get_object(
        Bucket='jaypublic',
        Key='data-nonexistent.json',
    )

    return json.loads(response['Body'].read())
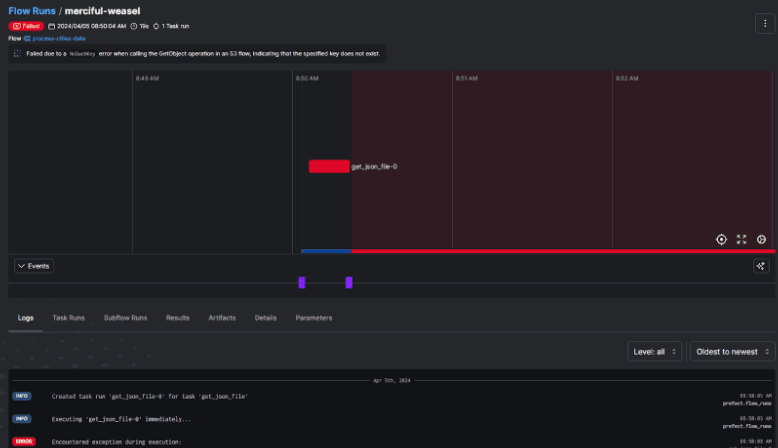
If you run this with a non-existent file (like I do in the code snippet above), Prefect will automatically try and fetch this file three times before giving up. You can see this failure clearly in the Prefect console, along with the last error and the full logs Prefect captured from the running Docker container process.

You can also take advantage of other reliability and workflow management features, such as Prefect’s built-in support for the Pydantic validation library , storing results across tasks, and event-driven workflow execution. Give them a try for yourself and see how Prefect simplifies building reliable, high-quality workflows and monitoring them across your architecture.
Prefect makes complex workflows simpler, not harder. Try Prefect Cloud for free for yourself, download our open source package, join our Slack community, or talk to one of our engineers to learn more.